How to setup a LAN port from DSL router as WAN input for internet access using only the web interface on OpenWrt.
OpenWrt is a Linux based, embedded operating system for networking devices. Besides being open source, it is highly configurable and versatile. This post will show how to configure one of the LAN ports as WAN input (for xDSL routers, which have the WAN internally connected to the modem). There are no opensource drivers for ADSL op OpenWrt and this feature is therefore unavailable. It doesn't matter anyway, since DSL limited in bandwidth and is losing its popularity.
Many DSL routers are in fact more powerful platforms, with improved hardware, than ordinary routers. If you want to connect the router to wired LAN internet this is what you should do. I've done this on a router with a development snapshot installed (the difference is that development versions do not come with web interface preinstalled). If you have a regular release, you can skip LuCI installation, as you already have access to the web interface of the router.
Install LuCI
LuCI is the web interface server used by OpenWrt. First of all you need internet. Connect the router in the home network (wired LAN) and use the serial port to access OpenWrt console (yes, the hardware serial port). I recommend the CH340G USB to serial TTL converter (cheapest possible, less than 1 USD) with the jumper set to 3.3 V. Find your device on OpenWrt table of hardware and identify serial port pins. Connect only ground, RX and TX lines and start a PuTTY session on the serial port, with 115200 baud, 8N1 settings. If, when the router is booting, you get nothing printed in console, switch RX and TX connections.
Temporarily, the router will be set as a client in your wired LAN. This is very simple to do - just write (or paste) the following commands in the serial console:
uci set network.lan.ipaddr=192.168.1.15
uci set network.lan.gateway=192.168.1.1
uci set network.lan.dns=8.8.8.8
uci commit network
reboot
Adjust IP address and gateway depending on your local network configuration. The IP should not be allocated to another device and it should be in the range of allowable addresses for your local network device. You just set a fixed IP. After it reboots, the router will have access to the internet. You can test this by issuing ping commands in the serial console. It's time to install the web interface. Run these commands in serial console:
opkg update
opkg install luci
/etc/init.d/uhttpd start
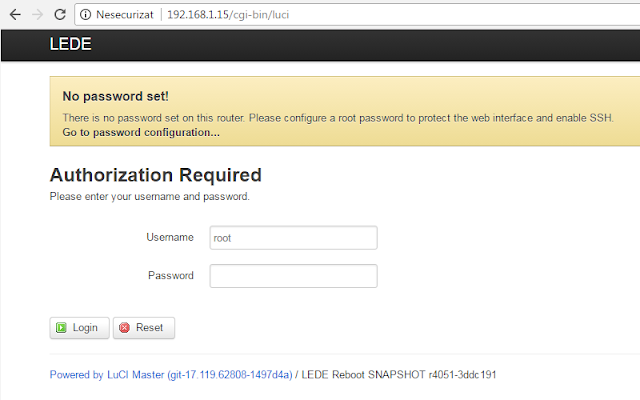
Using any computer connected to the same local network as the OpenWrt router, open the browser and go to the IP address you set earlier (192.168.1.15 in my example). You should see LuCI login screen.

OpenWrt (LEDE for a while) LuCI login screen
Click on Login button, then follow the warning message and set a password for the router.
Create VLAN
To be able to set a port of the switch as WAN (wide area network) port, you need to create a virtual LAN (VLAN) for it. There is already one VLAN which includes all available ports (physical wired LAN ports and the CPU port). To add an additional VLAN, go to Network - Switch and click the Add button to add another VLAN. You should have two VLANs with IDs 1 and 2. VLAN 1 will remain the switch LAN. VLAN 2 will be configured for WAN access.
Now, the port that you want to make WAN must be off (disabled) in VLAN 1 and used in VLAN 2 (untagged). The rest of the switch ports that will be used for local clients must be untagged in VLAN 1 and disabled (off) in VLAN 2. Only the CPU port must be tagged in both VLANs. Have a look at the following screenshot, which sets LAN port 1 as WAN.

WAN port on second VLAN
Once you are done, click Save button.
Network protocol
VLAN 1 (eth0.1) is your LAN network. The most used configuration here is DHCP server (meaning you connect devices to it and those devices get an IP address from OpenWrt). Go to Network - Interfaces and edit the default LAN (br-lan).
- Common Configuration: General setup:
- Protocol: Static address
- IPv4 address: 192.168.2.1 (or whatever address you want to access LuCI). If you want to have a well configured network, with access to the main router (gateway), make sure this address is different and not in the range of the DHCP addresses of the gateway (i.e. if your main router is at 192.168.1.1, set OpenWrt router at 192.168.2.1)
- Use custom DNS servers: 192.168.2.1, 8.8.8.8 and add 8.8.4.4 (optional, that's what I prefer; note that the first server is the IP of the router). If you do add DNS servers, if you want .lan domains to work, make sure the first DNS server is your router's.
- Common Configuration: Physical settings:
- Bridge interfaces: should already be checked
- Interface: make sure VLAN 1 and WiFi are there (
eth0.1andwlan0)
Save, but do not apply yet. Once you apply these settings, your device turns into a router and you'll have to connect to it as a LAN client (if you used 192.168.2.1 as OpenWrt address, clients will be given addresses in this range: 192.168.2.xxx). Let's have WAN port configured too. VLAN 2 (eth0.2) has only one port and from the WAN side, your OpenWrt router is just a client in a bigger network. Return to Network - Interfaces and click Add new interface with the following settings.
- Name of the new interface: whatever you want here, I chose
wwan - Protocol of the new interface: DHCP client. PPPoE is also a valid choice if needed.
- Create a bridge over multiple interfaces: No (unchecked)
- Cover the following interface: the VLAN with WAN port, VLAN 2 in my case (
eth0.2)
Click Submit, apply all settings (top right button) and make proper connections. OpenWrt web interface is now available only to LAN clients (wired or wireless).
Internet access
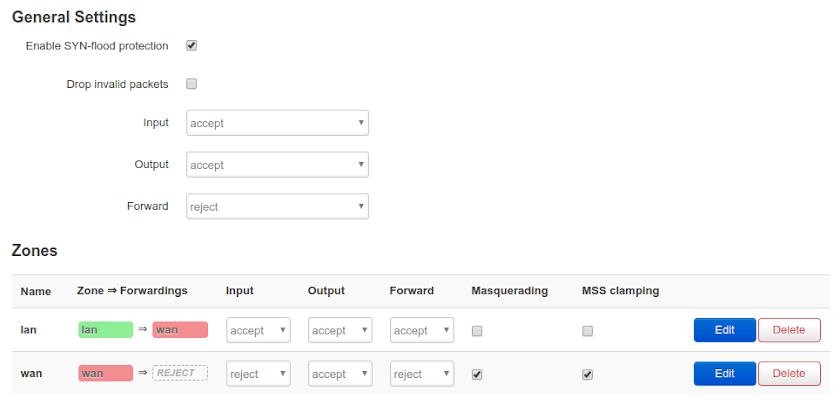
In case you do not have internet access, firewall and DNS servers should be checked. Go to Network - Firewall and:
- Edit LAN zone and make sure it allows forwarding to WAN zone
- Edit WAN zone: reject input and forward, turn on masquerading and MSS clamping and let it forward traffic from LAN

Firewall configuration for WAN
This is how your firewall configuration should look (see this forum thread). Now, let's go to Network - DHCP and DNS. In Server Settings - General Settings - DNS forwardings you can add server IPs 8.8.8.8 and 8.8.4.4 (that's not important to you, but it allows OpenWrt operating system to connect to the internet).
The OpenWrt router is now ready to use.


Hey, what if you using VPN with that, will it still work?
ReplyDeleteYes, it should work.
DeleteHey.. Great tutorial ! Thanks for this... One thing though, for internet access, didn't you forget to also :
ReplyDeleteEdit WAN zone: add wwan (the new eth WAN interface) in the Covered networks ? If I don't do this, my internet doesn't work. On my config, I now have the covered networks as "wan, wan6 (both are for my pppoe dsl port) AND wwan).
Cheers! P.
Looks easy enough, saved this tutorial to my bookmarks!
ReplyDeleteThe bestest tutorial how to create a new WAN port to keep a device working. Congrats.
ReplyDeleteIt's working fine for me. Thank you so much.
Great tutorial, I managed to change the WAN port but I still cannot connect to the web, even though the router is seen by the device to which it connects... are there other parameters to configure since this was posted?
ReplyDeleteThere are not other parameters to configure. Sometimes the firewall blocks connections but a reboot should fix it. Otherwise, allowing all traffic through firewall would make web connections possible, but that is not recommended.
DeleteGreat tutorial. I'd like to supplement that, if you have a "CPE" interface for the original WAN (say eth1) in order to access the CPE modem's web GUI or ping the CPE modem, now that you have eth0.2 as WWAN (or WAN2), and also have created a corresponding new CPE2 on eth0.2, don't forget to stop (shut down) the original CPE interface in Luci or disable in /etc/config/network, so that you can access the CPE modem from the new CPE2 (eth0.2).
ReplyDelete